
Using Iridient Developer with Apple Aperture
The information below details getting photos already stored in a Aperture library into Iridient Developer using Aperture itself, in addition to working through Aperture to open images you can always open your original image files directly into Iridient Developer independently from Aperture using drag and drop from the Finder or using the Open dialog. Just because an image has been imported into your Aperture library there is no requirement that you only use Aperture to access or process your image.
Opening original (unedited) images from Aperture into Iridient Developer
Do not use drag and drop from Aperture. Unfortunately Aperture is one of the few image mangagement tools that does not properly support drag and drop of images onto other editors like Iridient Developer. When using Aperture with drag and drop it will always apply its processing to the image and convert to JPEG format which is almost never what you want when using another image editor for high quality work. This applies to both RAW and non-RAW image formats such as TIFF. Again, do not use drag and drop with Aperture.
You can use Aperture's "Show In Finder" functionality either in the File menu or in the contextual menu by control+click or right clicking on an image to quickly select an image in the Finder and then open the image by drag and drop from the Finder onto Iridient Developer's icon in the dock. You can also open selected image(s) from the Finder by double clicking or using key combo command+O if Iridient Developer is setup as the default "Open With" program for the file type. To set the Open With progam select an image in the Finder and choose Get Info (command+I) from the File menu. In the Open With section of the Info dialog click the popup menu item and select Iridient Developer. To apply the change to all images of this type (TIFF, JPEG, RAW, etc) click the "Change All..." button.
Using Iridient Developer as an external editor
If you are working with RAW images Aperture does not directly support external editing of RAW images. Beginning with Iridient Developer 2.4 youcan now automatically search for and open RAW images based on the file name of the external edit file created by Aperture. One disadvantage of using the external editor interface is that it is slightly slower than using the drag and drop method above due to Aperture having to first process and save the intermediate image before sending it on for external editing by Iridient Developer. With RAW files the processed image prepared by Aperture will simply be overwritten. However, a very nice advantage to using the external editor interface is that the images can automatically be grouped with the original in Aperture and there is no need for any extra import or folder synchronization process after processing the image out of Iridient Developer. For many the ease of getting images from Iridient Developer back into Aperture will outweigh the extra Aperture rendering time for the intermediate image.
To setup external editor options in Aperture:
- Choose "Preferences..." from the Aperture menu or key combo command+comma.
- Click the "Export" tab button near the top of the dialog.
- In the External Photo Editor section click the Choose button and select the Iridient Developer application.
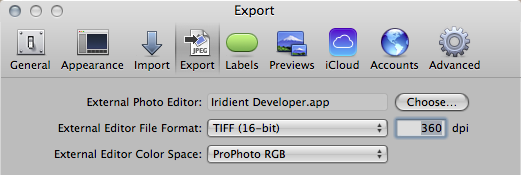
- Iridient Developer supports all external editing file formats (TIFF, PSD), color spaces, dpi and bit depth options offered by Aperture so you are free to choose whatever options work best for your needs. 16 bits/channel TIFF would be recommended for highest quality but it will take the most disk space. 8 bits/channel TIFF will take up half the disk space. If using 8 bits/ch I generally recommend sRGB for the color space unless you regularly use another color space option for your editing needs. At 16 bits/ch larger gamut color spaces like ProPhotoRGB can better preserve all the color information present in RAW images, but large gamut color spaces are not suitable for 8 bits/channel use.
- After setting up the various external editor options you can close the Preferences dialog.
Here is an example of the Aperture external photo editor options setup for Iridient Developer:
To setup Iridient Developer to automatically load the source RAW image when being used as an external editor:
- Choose "Preferences..." from the Iridient Developer menu or key combo command+comma.
- In the General section of the dialog check the "Find and load RAW..." checkbox.
- Click the OK button to close and save the Preferences.
After setting up the external editor options in Apeture to open images using Iridient Developer as an external photo editor choose "Edit With Iridient Developer.app..." from the Photos menu or use the key combo command+shift+O or select from this item from the contextual image menu that can be opened by right clicking on an image or using control+click.
Using iPhoto's External RAW Editing Support When Sharing A Library With Aperture
Recent versions of iPhoto and Aperture allow you to share libraries between the two programs. If you use a shared library with iPhoto another way to get RAW photos from your Aperture library into Iridient Developer is using iPhoto's good support for RAW external editing.
To setup RAW external editor options in iPhoto:
- Choose "Preferences..." from the iPhoto menu or key combo command+comma.
- Click the "Advanced" tab button near the top of the dialog.
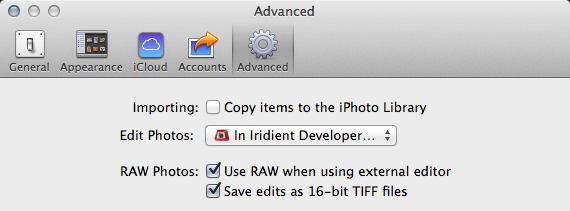
- In the Edit Photos section click the popup menu, choose In... and select the Iridient Developer application.
- In the RAW Photos section check the "Use RAW when using external editor" checkbox
- If you are also working with non-RAW images and are OK with using extra disk space for external edits, for highest quality check the "Save edits as 16-bit TIFF files" option.
- Close the Preferences dialog to save your changes.
Here is an example of the iPhoto external editor options setup for Iridient Developer:
After making the above changes in iPhoto you can launch Iridient Developer as your external editor for RAW files by selecting an image and choosing "Edit Photo" (or command+E) from the Photos menu. You can also click the "Edit" button in the bottom toolbar in the iPhoto window or by right clicking (or control+clicking) on the image and choosing "Edit In External Editor" from the contextual menu.
Getting Processed Images from Iridient Developer Back Into Aperture
If you are using the extrnal editing functionality it is very easy to get your processed images from Iridient Developer back into Aperture. Simply overwrite the intermediate external edit image and the modified image will automatically appear in your Aperture library. In Iridient Developer 2.4 you can choose "Process Image and Overwrite (Std Image)" from the File menu or use the key combination command+option+E to quickly overwrite the intermediate image using the same file format, bit depth, color space and dpi options as setup in the Aperture Preferences dialog. For more control over the export settings you can use the normal Save dialog by choosing "Process Image and Save As..." from the File menu or key combo command+E. You will need to be sure to use the identical file name and folder location as the original Aperture intermediate file in order to have the processed file automatically update in Aperture's library.
You can also use Apeture's Hot Folder script to setup a folder for auto importing processed images from Iridient Developer back into Aperture. This script can be downloaded from Apple's site here: Aperture Hot Folder Script
A third option for getting processed images back into your Aperture library if you share your library with iPhoto is to simply open the images back into iPhoto which doesn't require the more involved Import process of Aperture. In the Save dialog in Iridient Developer enable (check) the "Open processed image with" checkbox and in the popup menu choose "iPhoto" or click the "Choose..." button to select iPhoto for the first time. This will cause the processed image to automatically open into iPhoto when the image is saved and then iPhoto will add it to your library.
And finally you can also import images processed from Iridient Developer using the Import dialog in Aperture by clicking the Import button in the top toolbar or using key combo command+I.
| Copyright © 2014 Iridient Digital, Inc. All Rights Reserved. | Apple, Aperture and iPhoto are trademarks of Apple Inc. | PRIVACY POLICY |